Thursday, 26 February 2015

How to Install A Network Printer In Windows 7 / Vista easy guide with pictures

Install A Network Printer In Windows 7 / Vista

Install a Network Printer in Windows 7 / Vista
  1. Click on the Start button, and then click on Devices and Printers.
  2. In the Devices and Printers window, click on the Add a printer button.
  3. In the Add Printer wizard, click on the option Add a network, wireless, or Bluetooth printer.Windows will display a list of available printers.
  4. Select a printer from the list, or click on the option The printer that I want isn't listed to find the desired printer. (To find a printer, proceed to step 5.
  5. To find a printer not on the list, perform the following: 
    • Select the option Add a printer using a TCP/IP address or hostname, and then click on theNext button. (NoteConsult the printer list to find your printer's IP address.)
    • Enter the IP address in the Hostname or IP address text area. (As you type the address, Windows also adds the address automatically to the Port name text area, as shown in the example below.)
    • Install the driver for your printer by selecting the printer's manufacturer from the Manufacturer and then the model number. (If the model number of your printer isn't listed, click on theWindows Update button to list additional printer models.)Click on the Next button.
  6. Enter a descriptive name for your printer in the Printer name text area or leave the name that is already filled in, then click on the Next button. (In the example below, "Xerox WorkCentre 7345 PCL6" has been entered for the printer name.)NoteYou can change the printer name at any time. 

    You should see the following window showing that Windows 7 has started the process of installing the printer:
  7. In the next window, make sure the option Do not share this printer is selected, and then click on theNext button.If the printer was added successfully, you should see the following window:
  8. In the message window shown in step 7, click on the Print a test page button if you want to print a test page to verify you can print with the printer, and then click on the Finish button.
  9. You can view the new printer listing by clicking again on the Start button, and then clicking again onDevices and Printers. You should see the entry for your printer. (In the example below, "Xerox WorkCentre 7345 PCL6" has been added.)

Sunday, 28 December 2014

How do I fix network adapter problems? Windows 7

How do I fix network adapter problems?


If you can't connect to a network, there might be a problem with your network adapter. First, try using the Network Adapter troubleshooter to automatically find and fix some common problems:
  • Open the Network Adapter troubleshooter by clicking the Start button Picture of the Start button, and then clicking Control Panel. In the search box, type troubleshooter, and then click Troubleshooting. Click View all, and then click Network Adapter.
If running the Network Adapter troubleshooter doesn't fix the problem, here are some more things to try
Follow the steps and detailed Procedure below:

  • Make sure the network adapter is enabled
  • Reset the network adapter
  • Update the network adapter driver
  • If all else fails, replace the adapter
  • Disabling or uninstalling a network adapter


To enable the adapter:

  1. Open Network Connections by clicking the Start button Picture of the Start button, and then clicking Control Panel. In the search box, typeadapter, and then, under Network and Sharing Center, click View network connections.
  2. Right-click the network adapter icon, and then click EnableAdministrator permission required If you're prompted for an administrator password or confirmation, type the password or provide confirmation.

To reset the adapter:
  1. Open Network Connections by clicking the Start button Picture of the Start button, and then clicking Control Panel. In the search box, typeadapter, and then, under Network and Sharing Center, click View network connections.
  2. Right-click the network adapter icon, and then click DisableAdministrator permission required If you're prompted for an administrator password or confirmation, type the password or provide confirmation.
  3. Right-click the adapter icon again, and then click EnableAdministrator permission required If you're prompted for an administrator password or confirmation, type the password or provide confirmation.
The adapter is now reset. Try connecting to the network again, or run the Network troubleshooter to verify that your network adapter is now working correctly.
  • Open the Network troubleshooter by right-clicking the network icon in the notification area, and then clickingTroubleshoot problems.

Update the network adapter driver

You must be logged on as an administrator to perform these steps.
If you reset your network adapter and you still can't connect to a network, you might need to update the adapter driver. (Updating the driver can solve the problem of missing or failed drivers, as well as outdated ones.) To update your network adapter driver, follow these steps:
  1. Open Device Manager by clicking the Start button Picture of the Start button, clicking Control Panel, clicking System and Security, and then, under System, clicking Device Manager.‌ Administrator permission required If you're prompted for an administrator password or confirmation, type the password or provide confirmation.
  2. Double-click Network Adapters, right-click your adapter, and then click Properties.
  3. Click the Driver tab, and then click Update Driver.
    If Windows can't find the driver on your computer and you don't have a connection to the Internet, you might need to contact the network adapter manufacturer or your computer manufacturer to get the driver. Check the information that came with your network adapter or your computer to see if you have a disc that contains the drivers.
Once you've updated the driver, try connecting to the network again, or run the Network troubleshooter to verify that the adapter is updated.
  • Open the Network troubleshooter by right-clicking the network icon in the notification area, and then clickingTroubleshoot problems.

If all else fails, replace the adapter

If you've tried resetting the network adapter and updating the drivers, and the Network troubleshooter indicates that there's still a problem with your network adapter, try replacing the adapter. Buy a new network adapter and install it in your computer by following the manufacturer's instructions, or have a service technician replace the adapter for you.

Disabling or uninstalling a network adapter

If you decide that you don't want to use a particular network adapter, you can either disable it (which is the easiest) or uninstall it.

To disable a network adapter

Disabling a network adapter turns it off so that it won't be used.
  1. Open Network Connections by clicking the Start button Picture of the Start button, and then clicking Control Panel. In the search box, typeadapter, and then, under Network and Sharing Center, click View network connections.
  2. Right-click the network adapter icon, and then click DisableAdministrator permission required If you're prompted for an administrator password or confirmation, type the password or provide confirmation.

To uninstall a network adapter

Warning

  • Turn off your computer and unplug it from its power source. This is very important. Installing a card in a computer that's plugged in could shock you or damage the card and computer.
  1. Read the information that came with your computer to learn how to open the computer case. If you no longer have the instructions, look on the computer cover (usually on the back) for screws or clasps to undo the case.
  2. After opening the case, ground yourself by touching the metal casing that surrounds the jack where the power cord plugs in. This can help protect you from an electric shock and can help protect the new card and existing computer parts from static electricity.
  3. Read the information that came with your network adapter. If you no longer have the instructions, locate your network adapter. If you're not certain which card is your network adapter, follow the wires from your network cable to the back of the card, and then note which slot that card is in.
  4. Unplug any cables from the back of the network adapter, and remove any screws or hooks holding the network adapter in place.
  5. Carefully pull the network adapter straight out of the slot. Be careful not to twist or bend it as you remove it.
  6. If you're not installing a new network adapter, install a slot cover if you have one, and then replace the screw or hook. Then, close the computer case and replace any screws you removed when opening the case.

Thursday, 18 December 2014

Troubleshoot Network & Internet Problems in Windows 7 & Windows 8

When you have problems with your network and/or Internet connection, don’t hesitate to use the troubleshooting wizards bundled with Windows 7 and Windows 8. They are easy to use and they can help you identify what’s wrong and how to fix your problems. In this tutorial I will show how to start these network and Internet troubleshooting wizards and how to work with them in order to fix problems.

How to Find the Network & Internet Troubleshooting Wizards

One of the easiest ways to access the network and Internet troubleshooting wizards is to open the Network and Sharing Center and click or tap the "Troubleshoot problems" link.
This is how the Network and Sharing Center looks like in Windows 7.
Network and Internet Troubleshooting, Windows 7, Windows 8
In Windows 8, the Network and Sharing Center is a bit different. However, the "Troubleshoot problems" link can still be found at the bottom of the window.
Network and Internet Troubleshooting, Windows 7, Windows 8
This opens the list of Network and Internet troubleshooting wizards available in Windows.
Network and Internet Troubleshooting, Windows 7, Windows 8
As always, you can also use search to launch these wizards. In Windows 7, type the word "trouble" in the Start Menu search box. Then, click theTroubleshooting search result.
Network and Internet Troubleshooting, Windows 7, Windows 8
In Windows 8, go to the Start screen, type the word "trouble" and filter the results by Settings.
Network and Internet Troubleshooting, Windows 7, Windows 8
Then, tap the Troubleshooting search result.
Another way is to type the word "trouble" in the search box found on the top right of the Control Panel.
Network and Internet Troubleshooting, Windows 7, Windows 8
Clicking or tapping or Troubleshooting reveals the Troubleshooting window, where you find all the troubleshooting tools included in Windows.
Network and Internet Troubleshooting, Windows 7, Windows 8
To display the troubleshooting wizards we are interested in, click or tap Network and Internet.
You can start any of the available wizards, depending on the problem you are facing:
  • Internet Connections - this wizard helps when you are connected to the network but the Internet doesn't work or you have trouble accessing particular websites;
  • Shared Folders - use this wizard when you have problems accessing shared files and folders on other computers and devices from your network;
  • HomeGroup - when you have problems viewing computers or shared folders that are part of the Homegroup, use this wizard;
  • Network Adapter - this wizard is useful when you have problems with your wireless or network adapters. It helps with anything that is related to your network connection;
  • Incoming Connections - this wizard is helpful when other computers have trouble connecting to your computer's shared files and folders;
  • Connection to a Workplace Using DirectAccess - this wizard can be used when you have problems connecting to enterprise network domains. It is available only in Windows 7 Ultimate, Windows 7 Enterprise and Windows 8 Enterprise.

Start the Network & Internet Troubleshooting Wizards from the Command Prompt

The network and Internet troubleshooting wizards can also be started using the Command Prompt or the Run window.
Copy and paste the following commands:
  • To open the Internet Connections troubleshooting wizard - msdt.exe -id NetworkDiagnosticsWeb;
  • To open the Shared Folders troubleshooting wizard - msdt.exe -id NetworkDiagnosticsFileShare;
  • To open the HomeGroup troubleshooting wizard - msdt.exe -id HomeGroupDiagnostic;
  • To open the Network Adapter troubleshooting wizard - msdt.exe -id NetworkDiagnosticsNetworkAdapter;
  • To open the Incoming Connections troubleshooting wizard - msdt.exe -id NetworkDiagnosticsInbound.

How to Use the Network & Internet Troubleshooting Wizards in Windows 7 & Windows 8

Each troubleshooting wizard is a bit different because it solves the specific problems it is supposed to solve. To help you understand how to use a troubleshooting wizard, I ran the Network Adapter wizard in order to understand what is wrong with the wireless network connection on my Windows 8 laptop. Using other wizards works the same way, using the same principles.
At the beginning of the troubleshooting wizard, before you press Next look for a link named Advanced.
Network and Internet Troubleshooting, Windows 7, Windows 8
Click or tap on it. This reveals some interesting options. For example, the Network Adapter wizard can automatically apply repairs. Check the appropriate box to enable this feature and click or tap Next.
Network and Internet Troubleshooting, Windows 7, Windows 8
The troubleshooting wizard detects that I have several network adapters and asks me to select the one I want to troubleshoot. In this case, I selected WiFi and pressed Next.
Network and Internet Troubleshooting, Windows 7, Windows 8
NOTE: The Network Adapter troubleshooting wizard displays also virtual network adapters, if you have installed virtualization software that uses such devices (e.g. VirtualBox).
The troubleshooting wizard starts the diagnostics process and displays a progress bar like the one shown below.
Network and Internet Troubleshooting, Windows 7, Windows 8
When it detects problems, it also tries to apply the fixes it believes are appropriate and then verifies if the problem still exists.
Network and Internet Troubleshooting, Windows 7, Windows 8
At the end of the whole process, the troubleshooting wizard shares details about the problem and its status.
Network and Internet Troubleshooting, Windows 7, Windows 8
In my case, the problem remained unfixed. The Network Adapter wizard proposes additional options via the "Explorer additional options" button. If you want to view detailed information about the problem(s) it identified and what it has done to fix things, click the small link that says "View detailed information".
To close the wizard, click or tap Close
Click on Close and you are done.
NOTE: If the troubleshooting wizard you have used hasn't detected any problems but you still have issues, you may have not used the correct wizard. In this case, try another troubleshooting wizard, which is related to the problem you are experiencing.

Troubleshooting Problems with a Wireless Network

If you have troubles connecting to wireless networks, we recommend reading the following troubleshooting guides:
  • Troubleshoot Internet Connection Problems over a Wireless Network - this guide shows how to use the Windows built-in troubleshooting tools, to fix problems when connecting to wireless networks;
  • Troubleshoot Wireless Network Connection Problems by Yourself - this is a step by step chart with questions and answers. Answering a series of questions takes you to the most probable root-cause and its solution;
  • Fix Troublesome Wireless Connections by Removing their Profile - if you have problems with a wireless network which worked in the past, it can happen that its profile in Windows was changed or corrupted. This tutorial helps you fix problems in such scenarios.
  • The Layman’s Guide to Solving Wireless Network Interference Problems - an awesome guide, sharing how easy it is to fix problems generated by the signal interference, caused by other networks in your area or by other devices.

Wednesday, 10 December 2014

Five tools for optimizing Windows

Introduction

The Windows operating system has long been criticized because it tends to get bogged down over time. Installing applications, patches, drivers, etc., causes the OS to become cluttered. As a result, performance slowly diminishes. Fortunately, a number of applications can optimize your system and help restore performance.


Advanced System Optimizer

Once this tool optimizes your operating system, you can configure it to perform regular maintenance on a scheduled basis. Advanced System Optimizer sells for $39.95; a free trial version is available for download.

  >>>download this software here<<<

WinASO Registry Optimizer

Registry errors it detects are categorized and are rated by severity. You can correct an error by selecting it and clicking the Repair button. WinASO Registry Optimizer sells for $29.95; a free trial is available for download.

WinUtilities Free Edition

WinUtilities Free Edition is handy for performing basic PC maintenance. There is also a professional edition of this tool that performs other functions, such as registry and disk defragmentation, file level deduplication, file recovery, and disk cleaning.

>>>download this software here<<<

ARO 2013

There were two things I really liked about this application. First, it allows you to choose which areas of the registry you want to scan, repair, and optimize. That's great if you have certain portions of the registry you want left alone. I also really liked that the software can back up the registry for you in case it makes a mistake that causes registry problems.

ARO 2013 sells for $29.95; a free trial version is available for download.

CCleaner

CCleaner also features a registry cleaner, which — like ARO 2013 — lets you choose the areas of the registry you want to work with. CCleaner includes some other nice tools as well, such as a file finder, a drive wiper, and an uninstaller.

Monday, 13 October 2014

make Bootable usb pendrive in just 2 min.. using cmd simple steps!!!

Bootable usb pendrive using cmd

Creating a usb pendrive using command prompt is not hard, it is one of the most common ways to create a bootable usb.
      This method does not work if your operating sistem is windows xp or windows 8 , you cannot select the primary partition in comand prompt.
       You just need to follow these simple steps:
  1. First step is to obtain the windows files from somewhere and save them to a folder in your pc. You can rip a windows dvd , or if you have the iso image file you can open it with magic disc or daemon tools or even winrar , and you need to copy the whole content to a folder anywhere in your pc , you just need to make sure you know where it is located.
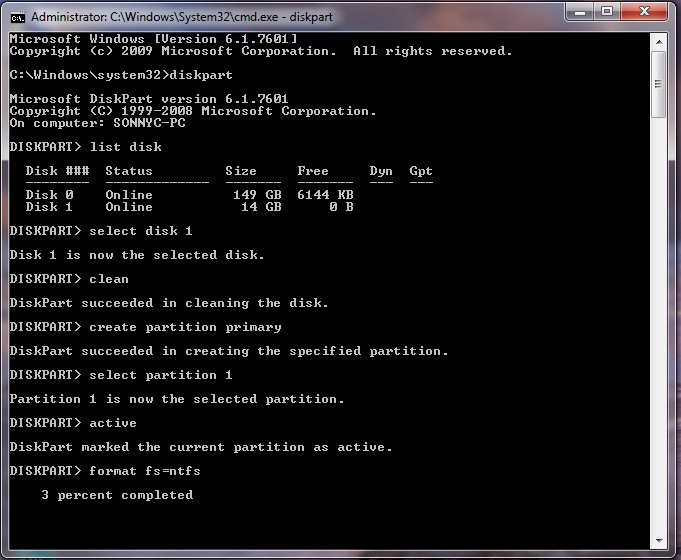
  2. Make sure your usb stick is inserted, go to start search cmd , right click the  file and select run as administrator. The command prompt will appear, now you need to write the following comands:
  3. diskpart→list disk→select disk 1(chose  the usb device, you will recognize it by its size)→clean(this will erase the usb)→create partition primary→select partition 1→active→format fs=ntfs(this will format the usb drive and will take 10-15 minutes)→Untitled 5
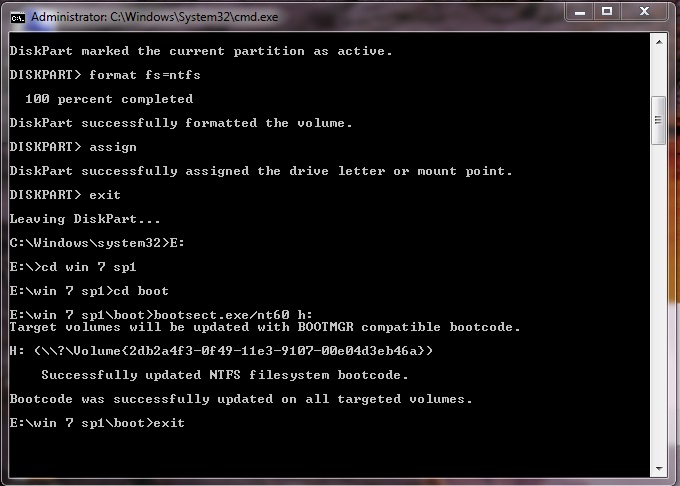
  4. After the format is done you have to continue writting  in command promt :  →assign(now you will notice that the usb drive changed its letter to (H): or (G))→exit(this command will exit the disk part function)
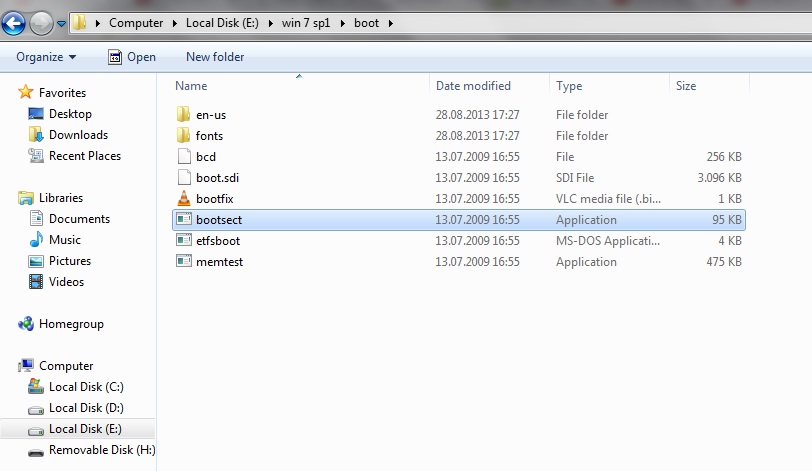
  5. Now you have to write the path to the executable file in your windows saved folder , make sure that in your windows folder you have the boot folder with the bootsect executable file.Untitled 8
  6. In my case the command goes like this:   E:→cd win 7 sp1→
           →cd boot→bootsect.exe/nt60 h:(h is the letter of the usb drive ,this comand will update the boot core)→exit (this will exit command prompt).
Untitled 6
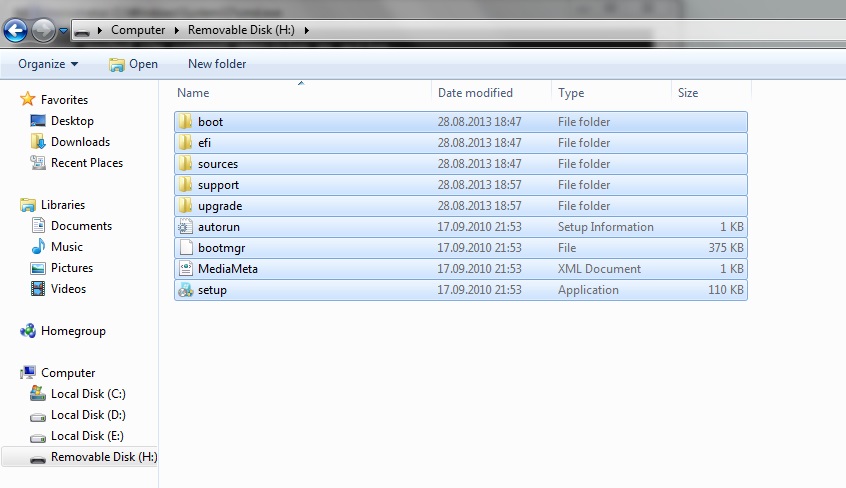
  1. Now you have to copy all the files in the windows folder to your usb drive. Untitled 7
  2. ALL DONE. You can now restart your pc and boot from the usb hard drive.

Tuesday, 7 October 2014

Windows 10 preview and 9 things u need to know!!!!

1. When can I upgrade? And how much will it cost?

Microsoft expects to release the OS sometime in 2015, after the company's Build developer conference in April. If you're feeling adventurous, you can sign up for the Windows Insider Program on October 1 to get your hands on the early (and likely buggy) preview build. The cost for the retail version has yet to be determined.

2. Windows 10? What happened to Windows 9?

Windows 7 ate 9. (I kid.) Microsoft wants us to think of the latest version as a fundamental change to how Windows works, and the company is skipping a version number to show it.
Keyboards and mice take center stage on Windows 10.

3. I've got a desktop, and a tablet. How will that work?

Windows 10 isn't just about PCs. The operating system will run on everything from desktops all the way down to smartphones, and the user interface will adjust accordingly.

4. What about apps?

Apps will be coming along for the ride too, though Microsoft hasn't explained how that's going to work. We do know that you'll be able to buy one app from the Windows Store and expect it to run on all your devices. Developers will presumably need to make universal apps that will adjust their look and feel, depending on your devices size and capabilities.

5. Those full-screen "Modern" apps were a pain. Are they still around?

Those touch-friendly, full-screen apps that debuted with Windows 8 were alternately known as the "Metro" or "Modern" design. For Windows 10, full-screen apps will be optional. Let's say you're using a convertible 2-in-1 device, like the Surface Pro 3, for example. When the keyboard is docked, you'll see the standard desktop with Windows 10's "new" old-school Start menu. Once you take the device off of the keyboard base, the OS will allow you to switch to the finger-friendly full screen mode Windows 8 users are likely familiar with.

6. I actually liked those Modern apps, and bought a few. Are they still around?

It's too soon to say how Windows 8 developers will react to the changes, but Microsoft did show some of its own full-screen Modern apps operating in a windowed mode.
Old is new again with the Windows 10 Start menu.

7. And the Start menu?

If you hated Windows 8's full-screen Start screen, you're in luck: the new Start menu harkens back to the good old days, sitting on the left side of the screen and presenting that familiar pop-up column of shortcuts. And if you liked Windows 8's approach, there's something here for you too: the new menu will incorporate Live Tiles and can be customized.

8. Never mind the apps -- I need to get things done. Any improvements on that front?

Windows 10 beefs up Snap, the function that lets you quickly arrange apps side by side, with a new quadrant layout that lets you split your display up among up to four apps. There's also support for multiple desktops (finally), so you can keep all your work apps in one place and quickly slide back to the desktop with your blogs and Reddit once your boss walks away. And then there's the task view button that lives on the taskbar. Click it, and you'll get a quick look at all of your open files, windows, and desktops.
We're going to need bigger screens
.
9. Will Windows 10 run on my machine?

It's too early to say. Windows 8.1 did introduce 64-bit computing requirements that ruled out some ancient processors, but it otherwise played well with PCs that weren't too old. Suffice to say, if you're picking up a newer device any time between now and Windows 10's release next year, you should be good to go. Once again, if you're willing to take risks, you can check out the Windows Insider Program for an early look. 

Monday, 4 August 2014

WATER COOLING for Gamer PC'S

Your CPU creates a large amount of heat, and it’s important that your computer’s cooling system is working to keep your CPU at a reasonable working temperature. In this video, you’ll learn about how heat sinks, cooling systems, and liquid cooling systems can keep your processors cool.
<<<<click here for video >>>>>

A very common method to cool the components inside of our computers is something called a heat sink. This is a copper or aluminum piece that is put on top of a very hot component. Usually these are the very hot chips that are right on our motherboards. And as they heat up, all of the heat is pulled up through this heat sink.
And because we have all these little holes that are being pulled here as the air blows through it, it is also cooling the top of the heap sink. So we’re able to dissipate that heat and get rid of it outside of our computing case. You can see that the surface area is very large. We take it from that very flat area and extend it up through these little fins, and let that air flow through.
One important piece of this is that underneath this heat sink where it is connecting to that very, very hot chip, we put a thermal grease that is designed to keep a good connection between the heat sink and the processor itself. If that particular connection is not very good, then the heat is not going to dissipate well.
And that thermal grease is designed to keep a very good connection between the heat sink and the component itself. One important safety tip is if you’re doing a lot of processing on your computer, these components are getting very hot. And because the heat sink is dissipating that heat, it also gets very hot.
So if you’re working inside of a computer that you’ve just turned off, be careful, because these heat sinks can get very, very warm to the touch. In your computer, there’s probably more than one heat sink that you have. You can see a heat sink that might be on a main processor. There’s other heat sinks that might be on a north bridge, and other components themselves may have other heat sinks.
These look kind of interesting in that they have these little fins come up, and they almost look like flames coming up through there for a little bit of a design right there on your motherboard. But they’re all performing the same function. They’re taking the heat off of these components that are on the motherboard itself, and pulling that heat right off so that the air can cool it as it goes by.
It’s also not uncommon to put heat sinks right on top of your processors, and on top of the heat sinks, you might even have fans that are pulling that air right off of the heat sink itself and sending it out of the case. So you may have fans on the case that are connected physically to the heat sinks themselves to add that much more cooling capability to those components.
Sometimes you’ll see an adapter card that has on it its own set of fans, especially if it’s something like a video card. These can be kind of bulky because you not only have the adapter card itself, but you’ve now put a fan inside of it to make sure that it gets its own cooling as well.
It’s almost always seen on these high end graphics cards, or other types of cards that are performing very, very high end processes, because those components tend to get very, very hot. If you don’t know how the air flows through your particular computer, you should take a look at it and see, even if it’s a laptop or a desktop, there on that device is a fan somewhere that’s pulling air in, and it should be exiting out another part of the case.
You’ll probably want to look in a desktop computer especially, because the layout of the motherboard becomes very important, especially the cables that you use to connect hard drives, cables that you’re using to connect back to the case itself all have an effect of the air flow through the device.
So you want to be sure that all of the fans are able to pull air through as efficiently as possible, and that none of those wires or cables are getting in the way. There’s a lot of different styles of fans, and a lot of different volume levels of fans that you can have in your case. You may not just have one.
You may have multiple fans, and they may be different sizes, but they all work together to make sure that you’re able to take the cool air from the outside and blow it through the inside of the computer to cool it off. Here’s an example of a server appliance that is using that same idea. There are fans that are pulling from the cool side and pulling that on top of and through the motherboard, and the air is exiting out these holes in the back.
And that’s an important consideration, is you want to be sure that those holes are always clear. You want to be sure there’s no dust. You want to be sure that the air is able to come into the computer and exit out as quickly as possible. If these start to get plugged, you’ll find that the temperature inside of your computer will rise very, very rapidly.
If you’re adding a fan or replacing a fan and a motherboard, you’ll find there are very standard sizes, usually something like an 80 millimeter or 120 millimeter, or different types, depending on the case that you have. These fans can also run at different speeds. Often you can plug the fan into an interface, and the motherboard sensors will determine how fast that fan needs to run based on how hot the inside of the computer case happens to be.
There are also different noise levels. So if you don’t like the fan that’s inside of your desktop computer now, you can probably find one that is much quieter at exactly the same size, that probably moves the same amount of air, and replace it, and immediately have a quieter computer. But we don’t always have to use air for our computing. We could use liquid. And these days, the liquid is a coolant that we are circulating.
In this case, you can see circulating from a connection that’s right on top of a processor, and it’s moving into a fan. It’s radiating out that heat as the air passes through, and then the liquid goes back onto that particular area to get heated up again, and the process repeats. It’s the same process we use for automobiles. It’s the same process we use for our large mainframe computers.
We’ve taken that liquid cooling and collapsed it into a size that’s small enough to put inside of our desktop computers. You usually see this on high end systems. If you’re doing a lot of gaming or a set of processes that really increases the amount of work the CPU does, maybe you need some additional cooling that the air cooling is just not going to be able to do for you.
And if you’re experimenting with your computer and you’re overclocking the CPU itself, you know that that processor is going to get warm. That may be a perfect example to, instead of using air cooling, use some type of liquid cooling for your processors.