Wednesday 18 March 2015

HOW TO VIEW HIDDEN FILES & FOLDERS IN WINDOWS 7
HOW TO VIEW HIDDEN FILES & FOLDERS IN WINDOWS 7


windows-7-showing-hidden-files-1This article shows you how to see hiddeen files and folders in Windows 7. Windows 7 hides important system files so that normally, you do not see them while exploring your computer.
The reason behind hiding these files is that users could inadvertently tamper with them or even delete those causing Windows 7 operations to falter. However, malicious software programs take advantage of this feature tocreate hidden files or folders and cause disruptions in the computer's operations without the user being able to detect them.
Therefore, being able to see hidden files or folders has its advantages and helps in repairing damages caused by unwanted hidden files. You can change the behavior of your Windows 7 computer to show hidden files by changing the settings in the Folder Optionsscreen. There are two primary ways you can reach the Folder Options screen. Start by closing down all open applications.
Windows 8 and 8.1 users can also refer to our How to View Hidden Files and Folders In Windows 8 & 8.1 article

METHOD 1: REACHING THE FOLDER OPTIONS SCREEN FROM WINDOWS EXPLORER

Click on the Windows Explorer icon in the TaskBar at the bottom left hand side of your Desktop:
windows-7-showing-hidden-files-2Figure 1. Icons in the Windows Panel
When the Explorer window opens, you have to click on the Organize button to display a drop down menu:
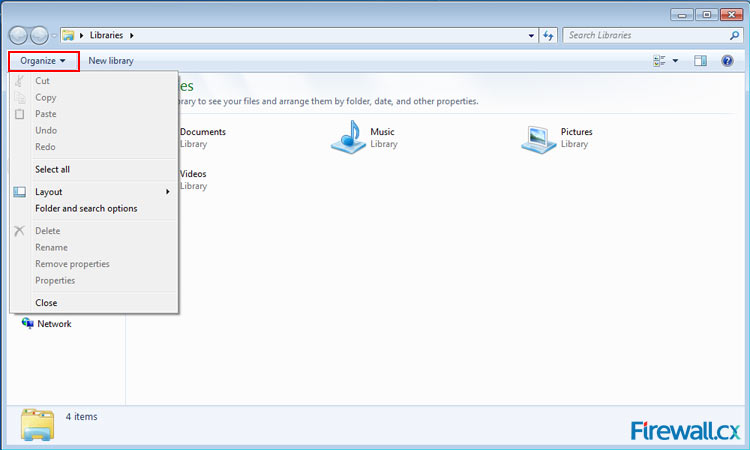
windows-7-showing-hidden-files-3Figure 2. Organize Menu
Next, Click on the Folder and Search options and the Folder Options screen opens up:
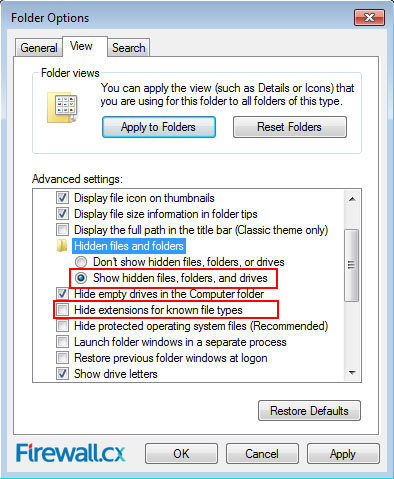
windows-7-showing-hidden-files-6Figure 3. Show hidden files, folders and drives & Hide extensions for known file types
In the Folder Options screen, click on the View tab, go to the Hidden files and folders option and click on the radio button under it labeled as Show hidden files, folders and drives. This will change all the invisible files and folders and make them visible.
It is important to note the Hide extension to know a file type option - normally, Windows keeps this hidden. While still in the Folder Options screen, go to the label Hide extensions for known file types and click to remove the checkmark against it as shown in the above screenshot. This will force Windows to show all extension types for all files.
When ready, click on the Apply and OK button to save the changes.

METHOD 2: REACHING THE FOLDER OPTIONS SCREEN FROM THE CONTROL PANEL

Click on the Start icon in the Panel at the bottom left hand side of your Desktop – see figure 4 below. In the resulting Start menu, you must click on the Control Panel option.
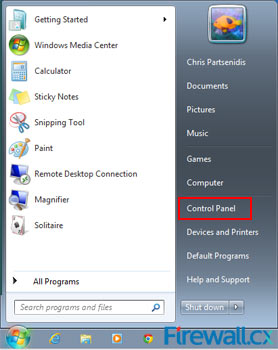
windows-7-showing-hidden-files-4Figure 4. Start Menu
This opens up the Control Panel screen, which allows you to control your computer's settings. Click on the Appearance and Personalization link to open up the Appearance and Personalization screen.
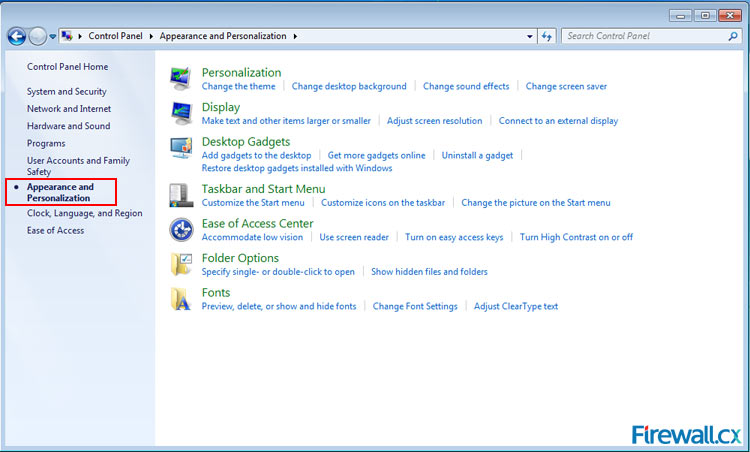
windows-7-showing-hidden-files-5Figure 5. Appearance and Personalization screen
Click on either Folder Options or Show hidden files and folders on the left window, to reach the Folder Options screen.
There are other ways as well to reach the Folder Options screen.
windows-7-showing-hidden-files-6Figure 6. Show hidden files, folders and drives & Hide extensions for known file types
In the Folder Options screen, click on the View tab, go to the Hidden files and folders option and click on the radio button under it labeled as Show hidden files, folders and drives. This will change all the invisible files and folders and make them visible.
It is important to note the Hide extension to know a file type option - normally, Windows keeps this hidden. While still in the Folder Options screen, go to the label Hide extensions for known file types and click to remove the checkmark against it as shown in the above screenshot. This will force Windows to show all extension types for all files.
Windows also hides files belonging to the operating system. To make these visible, click and uncheck the label Hide protected operating system files (Recommended). At this time, Windows will warn you about displaying protected system files and ask you whether you are sure about displaying them – Click on the Yes button.
When ready, click on the Apply and OK button to save the changes.

WINDOWS NOW SHOWS HIDDEN FILES AND FOLDERS

When we next browse through C: Drive, we'll notice that there are now additional folders and files which were previously hidden:
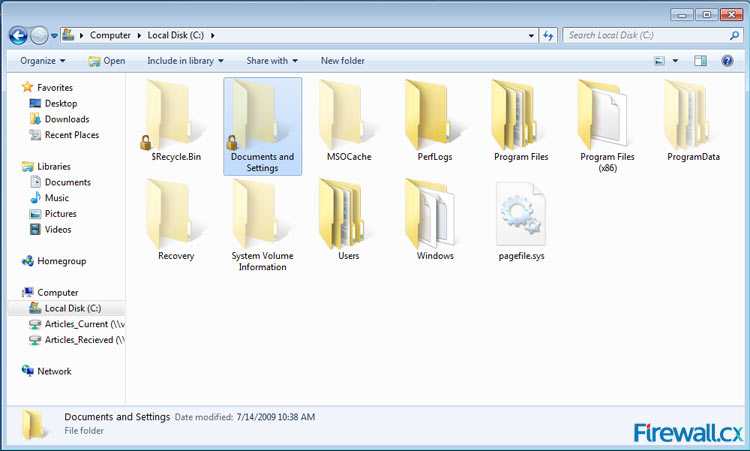
windows-7-showing-hidden-files-7Figure 7. C: Drive showing hidden folders
The folders with the semi-transparent icons are the hidden folders, while those with fully opaque icons are the regular ones.
If you do not want Windows 7 to show hidden files and folders, follow the reverse procedure executed in the Folder Options screen.
Tuesday 17 March 2015

Network Basics and Topologies Overview with images

NETWORK FUNDAMENTALS

A network is simply a group of two or more Personal Computers linked together. Many types of networks exist, but the most common types of networks are Local-Area Networks (LANs), and Wide-Area Networks (WANs).
In a LAN, computers are connected together within a "local" area (for example, an office or home). In a WAN, computers are further apart and are connected via telephone/communication lines, radio waves or other means of connection.

HOW ARE NETWORKS CATEGORIZED?

Networks are usually classified using three properties: Topology, Protocols and Architecture. 
Topology specifies the geometric arrangement of the network. Common topologies are a bus, ring and star.You can check out a figure showing the three common types of network topologies here.
Protocol specifies a common set of rules and signals the computers on the network use to communicate. Most networks use Ethernet, but some networks may use IBM's Token Ring protocol. We recommend Ethernet for both home and office networking. For more information, please select the Ethernet link on the left.
Architecture refers to one of the two major types of network architecture: Peer-to-peer or client/server. In a Peer-to-Peer networking configuration, there is no server, and computers simply connect with each other in a workgroup to share files, printers and Internet access.
This is most commonly found in home configurations and is only practical for workgroups of a dozen or less computers. In a client/server network there is usually an NT Domain Controller, to which all of the computers log on. This server can provide various services, including centrally routed Internet Access, mail (including e-mail), file sharing and printer access, as well as ensuring security across the network. This is most commonly found in corporate configurations, where network security is essential.


Network topologies can take a bit of time to understand when you're all new to this kind of cool stuff, but it's very important to fully understand them as they are key elements to understanding and troubleshooting networks and will help you decide what actions to take when you're faced with network problems.
This article explains the different network topologies found in today's networks. We examine Bus Topology, Ring Topology, Star Topology, Mesh Topology, Hybrid Topology and many more.

PHYSICAL AND LOGICAL TOPOLOGIES

There are two types of topologies: Physical and Logical. The physical topology of a network refers to the layout of cables, computers and other peripherals. Try to imagine yourself in a room with a small network, you can see network cables coming out of every computer that is part of the network, then those cables plug into a hub or switch. What you're looking at is the physical topology of that network !
Logical topology is the method used to pass the information between the computers. In other words, looking at that same room, if you were to try to see how the network works with all the computers talking (think of the computers generating traffic and packets of data going everywhere on the network) you would be looking at the logical part of the network. The way the computers will be talking to each other and the direction of the traffic is controlled by the various protocols (like Ethernet) or, if you like, rules.
If we used token ring, then the physical topology would have to change to meet the requirements of the way the token ring protocol works (logically).
If it's all still confusing, consider this: The physical topology describes the layout of the network, just like a map shows the layout of various roads, and the logical topology describes how the data is sent accross the network or how the cars are able to travel (the direction and speed) at every road on the map.
The most common types of physical topologies, which we are going to analyse, are: Bus, Hub/Star and Ring

THE PHYSICAL BUS TOPOLOGY

Bus topology is fairly old news and you probably won't be seeing much of these around in any modern office or home.
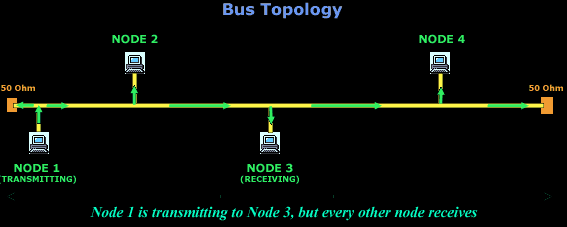
With the Bus topology, all workstations are connect directly to the main backbone that carries the data. Traffic generated by any computer will travel across the backbone and be received by all workstations. This works well in a small network of 2-5 computers, but as the number of computers increases so will the network traffic and this can greatly decrease the performance and available bandwidth of your network.
topologies-bus
As you can see in the above example, all computers are attached to a continuous cable which connects them in a straight line. The arrows clearly indicate that the packet generated by Node 1 is transmitted to all computers on the network, regardless the destination of this packet.
Also, because of the way the electrical signals are transmitted over this cable, its ends must be terminated by special terminators that work as "shock absorbers", absorbing the signal so it won't reflect back to where it came from. The value of 50Ohms has been selected after carefully taking in consideration all the electrical characteristics of the cable used, the voltage that the signal which runs through the cables, the maximum and minimum length of the bus and a few more.
If the bus (the long yellow cable) is damaged anywhere in its path, then it will most certainly cause the network to stop working or, at the very least, cause big communication problems between the workstations.
Thinnet - 10 Base2, also known as coax cable (Black in colour) and Thicknet - 10 Base 5 (Yellow in colour) is used in these type of topologies.

THE PHYSICAL HUB OR STAR TOPOLOGY

topologies-star
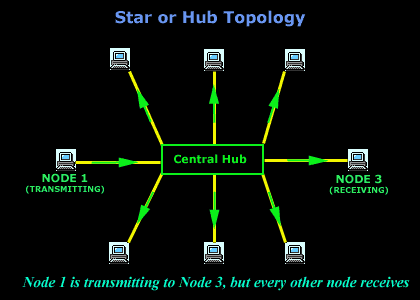
The Star or Hub topology is one of the most common network topologies found in most offices and home networks. It has become very popular in contrast to the bus type (which we just spoke about), because of the cost and the ease of troubleshooting.
The advantage of the star topology is that if one computer on the star topology fails, then only the failed computer is unable to send or receive data. The remainder of the network functions normally.
The disadvantage of using this topology is that because each computer is connected to a central hub or switch, if this device fails, the entire network fails!
A classic example of this type of topology is the UTP (10 base T), which normaly has a blue colour. Personally I find it boring, so I decided to go out and get myself green, red and yellow colours :)

THE PHYSICAL RING TOPOLOGY

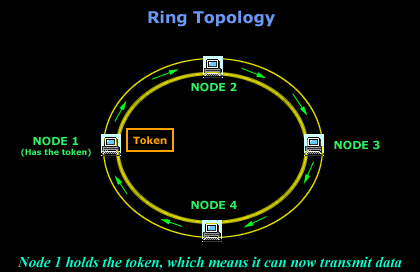
In the ring topology, computers are connected on a single circle of cable. Unlike the bus topology, there are no terminated ends. The signals travel around the loop in one direction and pass through each computer, which acts as a repeater to boost the signal and send it to the next computer. On a larger scale, multiple LANs can be connected to each other in a ring topology by using Thicknet coaxial or fiber-optic cable.
topologies-ring
The method by which the data is transmitted around the ring is called token passing. IBM's token ring uses this method. A token is a special series of bits that contains control information. Possession of the token allows a network device to transmit data to the network. Each network has only one token.

THE PHYSICAL MESH TOPOLOGY

topologies-mesh
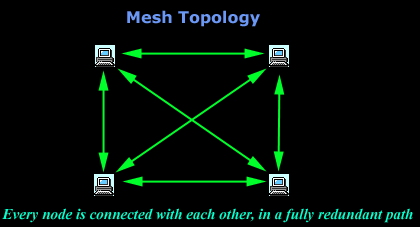
In a mesh topology, each computer is connected to every other computer by a separate cable. This configuration provides redundant paths through the new work, so if one computer blows up, you don't lose the network :) On a large scale, you can connect multiple LANs using mesh topology with leased telephone lines, Thicknet coaxial cable or fiber optic cable.
Again, the big advantage of this topology is its backup capabilities by providing multiple paths through the network.

THE PHYSICAL HYBRID TOPOLOGY

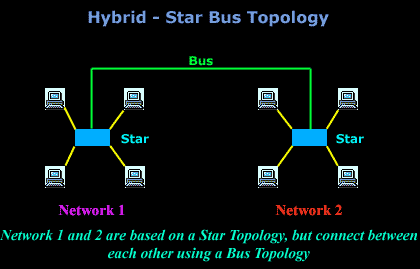
With the hybrid topology, two or more topologies are combined to form a complete network. For example, a hybrid topology could be the combination of a star and bus topology. These are also the most common in use.

STAR-BUS

topologies-hybrid-star-bus
In a star-bus topology, several star topology networks are linked to a bus connection. In this topology, if a computer fails, it will not affect the rest of the network. However, if the central component, or hub, that attaches all computers in a star, fails, then you have big problems since no computer will be able to communicate.

STAR-RING

topologies-hybrid-star-ring
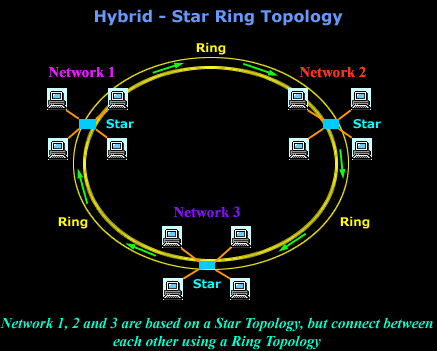
In the Star-Ring topology, the computers are connected to a central component as in a star network. These components, however, are wired to form a ring network.
Like the star-bus topology, if a single computer fails, it will not affect the rest of the network. By using token passing, each computer in a star-ring topology has an equal chance of communicating. This allows for greater network traffic between segments than in a star-bus topology.

Thursday 26 February 2015

How to Install A Network Printer In Windows 7 / Vista easy guide with pictures

Install A Network Printer In Windows 7 / Vista

Install a Network Printer in Windows 7 / Vista
  1. Click on the Start button, and then click on Devices and Printers.
  2. In the Devices and Printers window, click on the Add a printer button.
  3. In the Add Printer wizard, click on the option Add a network, wireless, or Bluetooth printer.Windows will display a list of available printers.
  4. Select a printer from the list, or click on the option The printer that I want isn't listed to find the desired printer. (To find a printer, proceed to step 5.
  5. To find a printer not on the list, perform the following: 
    • Select the option Add a printer using a TCP/IP address or hostname, and then click on theNext button. (NoteConsult the printer list to find your printer's IP address.)
    • Enter the IP address in the Hostname or IP address text area. (As you type the address, Windows also adds the address automatically to the Port name text area, as shown in the example below.)
    • Install the driver for your printer by selecting the printer's manufacturer from the Manufacturer and then the model number. (If the model number of your printer isn't listed, click on theWindows Update button to list additional printer models.)Click on the Next button.
  6. Enter a descriptive name for your printer in the Printer name text area or leave the name that is already filled in, then click on the Next button. (In the example below, "Xerox WorkCentre 7345 PCL6" has been entered for the printer name.)NoteYou can change the printer name at any time. 

    You should see the following window showing that Windows 7 has started the process of installing the printer:
  7. In the next window, make sure the option Do not share this printer is selected, and then click on theNext button.If the printer was added successfully, you should see the following window:
  8. In the message window shown in step 7, click on the Print a test page button if you want to print a test page to verify you can print with the printer, and then click on the Finish button.
  9. You can view the new printer listing by clicking again on the Start button, and then clicking again onDevices and Printers. You should see the entry for your printer. (In the example below, "Xerox WorkCentre 7345 PCL6" has been added.)

Sunday 28 December 2014

How do I fix network adapter problems? Windows 7

How do I fix network adapter problems?


If you can't connect to a network, there might be a problem with your network adapter. First, try using the Network Adapter troubleshooter to automatically find and fix some common problems:
  • Open the Network Adapter troubleshooter by clicking the Start button Picture of the Start button, and then clicking Control Panel. In the search box, type troubleshooter, and then click Troubleshooting. Click View all, and then click Network Adapter.
If running the Network Adapter troubleshooter doesn't fix the problem, here are some more things to try
Follow the steps and detailed Procedure below:

  • Make sure the network adapter is enabled
  • Reset the network adapter
  • Update the network adapter driver
  • If all else fails, replace the adapter
  • Disabling or uninstalling a network adapter


To enable the adapter:

  1. Open Network Connections by clicking the Start button Picture of the Start button, and then clicking Control Panel. In the search box, typeadapter, and then, under Network and Sharing Center, click View network connections.
  2. Right-click the network adapter icon, and then click EnableAdministrator permission required If you're prompted for an administrator password or confirmation, type the password or provide confirmation.

To reset the adapter:
  1. Open Network Connections by clicking the Start button Picture of the Start button, and then clicking Control Panel. In the search box, typeadapter, and then, under Network and Sharing Center, click View network connections.
  2. Right-click the network adapter icon, and then click DisableAdministrator permission required If you're prompted for an administrator password or confirmation, type the password or provide confirmation.
  3. Right-click the adapter icon again, and then click EnableAdministrator permission required If you're prompted for an administrator password or confirmation, type the password or provide confirmation.
The adapter is now reset. Try connecting to the network again, or run the Network troubleshooter to verify that your network adapter is now working correctly.
  • Open the Network troubleshooter by right-clicking the network icon in the notification area, and then clickingTroubleshoot problems.

Update the network adapter driver

You must be logged on as an administrator to perform these steps.
If you reset your network adapter and you still can't connect to a network, you might need to update the adapter driver. (Updating the driver can solve the problem of missing or failed drivers, as well as outdated ones.) To update your network adapter driver, follow these steps:
  1. Open Device Manager by clicking the Start button Picture of the Start button, clicking Control Panel, clicking System and Security, and then, under System, clicking Device Manager.‌ Administrator permission required If you're prompted for an administrator password or confirmation, type the password or provide confirmation.
  2. Double-click Network Adapters, right-click your adapter, and then click Properties.
  3. Click the Driver tab, and then click Update Driver.
    If Windows can't find the driver on your computer and you don't have a connection to the Internet, you might need to contact the network adapter manufacturer or your computer manufacturer to get the driver. Check the information that came with your network adapter or your computer to see if you have a disc that contains the drivers.
Once you've updated the driver, try connecting to the network again, or run the Network troubleshooter to verify that the adapter is updated.
  • Open the Network troubleshooter by right-clicking the network icon in the notification area, and then clickingTroubleshoot problems.

If all else fails, replace the adapter

If you've tried resetting the network adapter and updating the drivers, and the Network troubleshooter indicates that there's still a problem with your network adapter, try replacing the adapter. Buy a new network adapter and install it in your computer by following the manufacturer's instructions, or have a service technician replace the adapter for you.

Disabling or uninstalling a network adapter

If you decide that you don't want to use a particular network adapter, you can either disable it (which is the easiest) or uninstall it.

To disable a network adapter

Disabling a network adapter turns it off so that it won't be used.
  1. Open Network Connections by clicking the Start button Picture of the Start button, and then clicking Control Panel. In the search box, typeadapter, and then, under Network and Sharing Center, click View network connections.
  2. Right-click the network adapter icon, and then click DisableAdministrator permission required If you're prompted for an administrator password or confirmation, type the password or provide confirmation.

To uninstall a network adapter

Warning

  • Turn off your computer and unplug it from its power source. This is very important. Installing a card in a computer that's plugged in could shock you or damage the card and computer.
  1. Read the information that came with your computer to learn how to open the computer case. If you no longer have the instructions, look on the computer cover (usually on the back) for screws or clasps to undo the case.
  2. After opening the case, ground yourself by touching the metal casing that surrounds the jack where the power cord plugs in. This can help protect you from an electric shock and can help protect the new card and existing computer parts from static electricity.
  3. Read the information that came with your network adapter. If you no longer have the instructions, locate your network adapter. If you're not certain which card is your network adapter, follow the wires from your network cable to the back of the card, and then note which slot that card is in.
  4. Unplug any cables from the back of the network adapter, and remove any screws or hooks holding the network adapter in place.
  5. Carefully pull the network adapter straight out of the slot. Be careful not to twist or bend it as you remove it.
  6. If you're not installing a new network adapter, install a slot cover if you have one, and then replace the screw or hook. Then, close the computer case and replace any screws you removed when opening the case.

Thursday 18 December 2014

Troubleshoot Network & Internet Problems in Windows 7 & Windows 8

When you have problems with your network and/or Internet connection, don’t hesitate to use the troubleshooting wizards bundled with Windows 7 and Windows 8. They are easy to use and they can help you identify what’s wrong and how to fix your problems. In this tutorial I will show how to start these network and Internet troubleshooting wizards and how to work with them in order to fix problems.

How to Find the Network & Internet Troubleshooting Wizards

One of the easiest ways to access the network and Internet troubleshooting wizards is to open the Network and Sharing Center and click or tap the "Troubleshoot problems" link.
This is how the Network and Sharing Center looks like in Windows 7.
Network and Internet Troubleshooting, Windows 7, Windows 8
In Windows 8, the Network and Sharing Center is a bit different. However, the "Troubleshoot problems" link can still be found at the bottom of the window.
Network and Internet Troubleshooting, Windows 7, Windows 8
This opens the list of Network and Internet troubleshooting wizards available in Windows.
Network and Internet Troubleshooting, Windows 7, Windows 8
As always, you can also use search to launch these wizards. In Windows 7, type the word "trouble" in the Start Menu search box. Then, click theTroubleshooting search result.
Network and Internet Troubleshooting, Windows 7, Windows 8
In Windows 8, go to the Start screen, type the word "trouble" and filter the results by Settings.
Network and Internet Troubleshooting, Windows 7, Windows 8
Then, tap the Troubleshooting search result.
Another way is to type the word "trouble" in the search box found on the top right of the Control Panel.
Network and Internet Troubleshooting, Windows 7, Windows 8
Clicking or tapping or Troubleshooting reveals the Troubleshooting window, where you find all the troubleshooting tools included in Windows.
Network and Internet Troubleshooting, Windows 7, Windows 8
To display the troubleshooting wizards we are interested in, click or tap Network and Internet.
You can start any of the available wizards, depending on the problem you are facing:
  • Internet Connections - this wizard helps when you are connected to the network but the Internet doesn't work or you have trouble accessing particular websites;
  • Shared Folders - use this wizard when you have problems accessing shared files and folders on other computers and devices from your network;
  • HomeGroup - when you have problems viewing computers or shared folders that are part of the Homegroup, use this wizard;
  • Network Adapter - this wizard is useful when you have problems with your wireless or network adapters. It helps with anything that is related to your network connection;
  • Incoming Connections - this wizard is helpful when other computers have trouble connecting to your computer's shared files and folders;
  • Connection to a Workplace Using DirectAccess - this wizard can be used when you have problems connecting to enterprise network domains. It is available only in Windows 7 Ultimate, Windows 7 Enterprise and Windows 8 Enterprise.

Start the Network & Internet Troubleshooting Wizards from the Command Prompt

The network and Internet troubleshooting wizards can also be started using the Command Prompt or the Run window.
Copy and paste the following commands:
  • To open the Internet Connections troubleshooting wizard - msdt.exe -id NetworkDiagnosticsWeb;
  • To open the Shared Folders troubleshooting wizard - msdt.exe -id NetworkDiagnosticsFileShare;
  • To open the HomeGroup troubleshooting wizard - msdt.exe -id HomeGroupDiagnostic;
  • To open the Network Adapter troubleshooting wizard - msdt.exe -id NetworkDiagnosticsNetworkAdapter;
  • To open the Incoming Connections troubleshooting wizard - msdt.exe -id NetworkDiagnosticsInbound.

How to Use the Network & Internet Troubleshooting Wizards in Windows 7 & Windows 8

Each troubleshooting wizard is a bit different because it solves the specific problems it is supposed to solve. To help you understand how to use a troubleshooting wizard, I ran the Network Adapter wizard in order to understand what is wrong with the wireless network connection on my Windows 8 laptop. Using other wizards works the same way, using the same principles.
At the beginning of the troubleshooting wizard, before you press Next look for a link named Advanced.
Network and Internet Troubleshooting, Windows 7, Windows 8
Click or tap on it. This reveals some interesting options. For example, the Network Adapter wizard can automatically apply repairs. Check the appropriate box to enable this feature and click or tap Next.
Network and Internet Troubleshooting, Windows 7, Windows 8
The troubleshooting wizard detects that I have several network adapters and asks me to select the one I want to troubleshoot. In this case, I selected WiFi and pressed Next.
Network and Internet Troubleshooting, Windows 7, Windows 8
NOTE: The Network Adapter troubleshooting wizard displays also virtual network adapters, if you have installed virtualization software that uses such devices (e.g. VirtualBox).
The troubleshooting wizard starts the diagnostics process and displays a progress bar like the one shown below.
Network and Internet Troubleshooting, Windows 7, Windows 8
When it detects problems, it also tries to apply the fixes it believes are appropriate and then verifies if the problem still exists.
Network and Internet Troubleshooting, Windows 7, Windows 8
At the end of the whole process, the troubleshooting wizard shares details about the problem and its status.
Network and Internet Troubleshooting, Windows 7, Windows 8
In my case, the problem remained unfixed. The Network Adapter wizard proposes additional options via the "Explorer additional options" button. If you want to view detailed information about the problem(s) it identified and what it has done to fix things, click the small link that says "View detailed information".
To close the wizard, click or tap Close
Click on Close and you are done.
NOTE: If the troubleshooting wizard you have used hasn't detected any problems but you still have issues, you may have not used the correct wizard. In this case, try another troubleshooting wizard, which is related to the problem you are experiencing.

Troubleshooting Problems with a Wireless Network

If you have troubles connecting to wireless networks, we recommend reading the following troubleshooting guides:
  • Troubleshoot Internet Connection Problems over a Wireless Network - this guide shows how to use the Windows built-in troubleshooting tools, to fix problems when connecting to wireless networks;
  • Troubleshoot Wireless Network Connection Problems by Yourself - this is a step by step chart with questions and answers. Answering a series of questions takes you to the most probable root-cause and its solution;
  • Fix Troublesome Wireless Connections by Removing their Profile - if you have problems with a wireless network which worked in the past, it can happen that its profile in Windows was changed or corrupted. This tutorial helps you fix problems in such scenarios.
  • The Layman’s Guide to Solving Wireless Network Interference Problems - an awesome guide, sharing how easy it is to fix problems generated by the signal interference, caused by other networks in your area or by other devices.